Give and Go 1 on 1

Give and Go 1 on 1

1 on 1's, 2 on 2's, 2 on 1's, 3 on 2's, Hockey Drills, Individual Skill Drills, Passing & Timing, Team Skill Drills
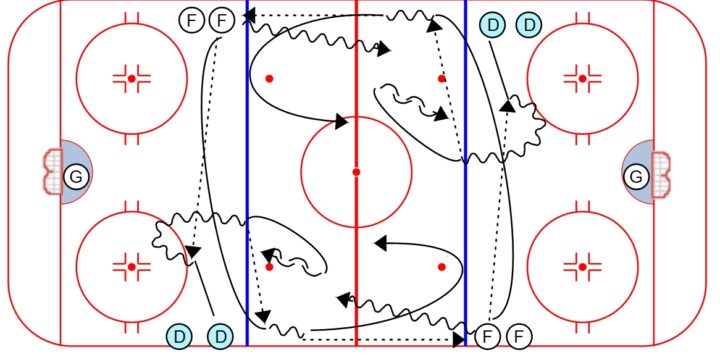
Give and Go 1 on 1 is another AWESOME drill from the Scott Fukami drill collections! This is another drill I picked up from the Scott Fukami drill collections available to DrillDraw owners. These drill collections are phenomenal, and are filled with hundreds of REALLY GOOD, well-drawn drills. I highly recommend getting all three drill sets if you own DrillDraw. Here's the diagram and explanation: Give and Go 1 on 1 **Drill starts on the whistle. Both ends at the same time. 1. On the whistle, the (F) makes a pass to the (D). 2. Return pass to the (F). 3. The (F) carries the puck under the blue line for a 1 on 1 on the opposite side. Option: A second (F) joins the play as the first (F)…
Read More
Anaheim 2 on 1 Drill

Anaheim 2 on 1 Drill

1 on 1's, 2 on 2's, 2 on 1's, 3 on 2's, Hockey Drills, Individual Skill Drills, Passing & Timing, Shooting, Team Skill Drills
Anaheim 2 on 1 Drill I have been getting really good usage out of the Scott Fukami drill collections. These drill collections are phenomenal, and are filled with hundreds of REALLY GOOD, well-drawn drills. If you own DrillDraw, I highly recommend picking up all the drill sets. Anaheim 2 on 1 Drill **Drill starts on the whistle. Both ends at the same time. 1. On the whistle, the (F) makes a pass to the (D). 2. The (D) makes a return pass to the (F). 3. The (F) makes a pass to the second (F). 4. 2 on 1 back. Enjoy! USE THIS DRILL IN YOUR OWN PRACTICE PLAN:
Read More
1 on 0 Headman Drill

1 on 0 Headman Drill

Hockey Drills, Individual Skill Drills, Passing & Timing, Warm-Up
1 on 0 Headman is an AWESOME drill. Give it a try!! I picked up this drill from the Scott Fukami drill collections available to DrillDraw owners. These drill collections are phenomenal, and are filled with hundreds of REALLY GOOD, well-drawn drills. I highly recommend picking up all three drill sets. Here's the diagram and explanation: 1 on 0 Headman 1. On the whistle, (1) passes a puck to the (D). 2. D to D pass, then a return pass to (1). 3. (1) receives the puck and makes a stretch pass to the "Ghost Man" (Gh), who has skated across the neutral zone. 4. (Gh) takes a shot. 5. (2) passes a puck to the (D). 6. D to D pass, then a return pass to (2) 7. (2)…
Read More
11 Visual Targets for Hockey Goalies

11 Visual Targets for Hockey Goalies

Goalie, Half Ice Drills, Hockey Drills, Individual Skill Drills
Use visual targets to help goalies play the angles properly Angles are, arguably, the most important part of a goaltender's game. If you cannot manage your angles appropriately, it will be more difficult to make the simple saves. Using these 11 visual cues on the ice will assist goaltenders, at all levels, to manage where they are on the ice. 11 Visual Cues: Sequence 1 1 & 11 - Goal Line 2 & 10 - Board-side Hashmarks 3 & 9 - Defensive Zone Dots 4 & 8 - Blue Line on the Boards 4 & 7 - Neutral Zone Dots 6 - Straight up the Middle 11 Visual Cues: Sequence 2 1. Spray paint lines on the ice that match up with the visual cues 2. Set up pucks further…
Read More
“S” Warm-up Drill

“S” Warm-up Drill

Hockey Drills, Individual Skill Drills, Neutral Zone, Passing & Timing, Team Skill Drills, Warm-Up
Use this Hockey Warm-up Drill to get everyone moving at the beginning of your practice! This is a great little high-speed hockey warm-up drill that incorporates many different elements of the game, including skating, passing, and shooting. I typically have my defensemen acting as the passers, since that neutral zone "d-to-d" pass is something they will need to perform over and over in games. Make sure to push those defensemen to make quick, hard, stick-to-stick passes to each other, and then fire that cross-ice pass hard and accurately. "S" Warm-up Drill 1. Forwards line up in the corner, two defensemen on each blue line 2. On whistle, first forward in each line passes out to the near defenseman 3. Defensemen execute D to D passes while forward skates the "S"…
Read More