Penalty Kill Forecheck Angling Drill

Penalty Kill Forecheck Angling Drill

Checking & Angling, Forecheck, Hockey Drills, Special Teams, Team Skill Drills, Team Systems Drills
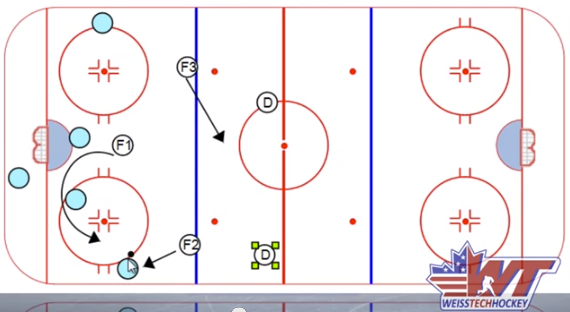
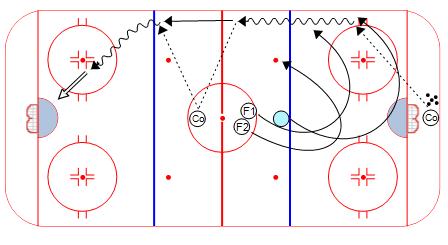
Penalty Kill Forecheck Angling Drill The Penalty Kill Forecheck Angling Drill works really well to teach proper angling technique for F1 & F2 on the PK forecheck. Here's the diagram and explanation: Penalty Kill Forecheck Angling Drill 1. Breakout man skates in, and opens up to either side for a breakout pass from the coach 2. F1 and F2 angle to take away the skating lane and passing lanes, respectively 3. If F1 and F2 fail to eliminate the breakout, the breakout man passes to the NZ coach for a give and go, and a shot on net Note: This drill can be run as a 2/3 ice drill by eliminating the option for a shot on goal. Play would end with the pass back to the NZ coach Enjoy!…
Read More
MacDonald Forecheck Drill

MacDonald Forecheck Drill

1 on 1's, 2 on 2's, 2 on 1's, 3 on 2's, Breakouts, Checking & Angling, Defensive Zone, Forecheck, Hockey Drills, Offensive Zone, Team Skill Drills, Team Systems Drills
MacDonald Forecheck Drill The MacDonald Forecheck is a nice little drill to work on forechecking lanes and angles. Here's the diagram and explanation: MacDonald Forecheck Drill 1. On whistle, forecheckers take a lap around the center circle 2. As the forecheckers finish their lap, coach dumps the puck in 3. Forecheckers attack, 5-man unit breaks out 4. After the breakout occurs, puck is passed back to the coach 5. 2 of the 3 forwards peel out to take a lap around the middle circle, becoming the new forecheckers (forwards must communicate who goes!) 6. As forecheckers finish the turn, coach dumps the puck in for a breakout from the far end 7. New 5-man unit moves into the end that just broke out Enjoy! Jeremy   USE THIS DRILL IN…
Read More
Fukami Breakout Warm-up Drill

Fukami Breakout Warm-up Drill

Breakouts, Defensive Zone, Hockey Drills, Individual Skill Drills, Passing & Timing, Team Skill Drills, Team Systems Drills
Fukami Breakout Warm-up Drill The Fukami Breakout Warm-up Drill is a great drill to get everybody moving. It incorporates a little bit of everything, and even involves the goalies in the play. Here's the diagram: Fukami Breakout Warm-up 1. On the whistle, forward dumps a puck on net 2. Goalie sets the the puck up for the defenseman, who has skated back to retrieve it 3. Forward times his/her skating, and explodes through the middle to receive a pass from the defenseman, then shoots Variation: The forward can delay in the corner, then make a pass to the defenseman for a shot on net. (Not shown) Enjoy! USE THIS DRILL IN YOUR OWN PRACTICE PLAN:
Read More
Controlled Skating Breakout Drill

Controlled Skating Breakout Drill

Breakouts, Hockey Drills, Individual Skill Drills, Passing & Timing, Team Systems Drills
Controlled Skating Breakout Drill Although this drill loosely mimics a breakout drill, the real purpose behind this one is to introduce Timing and Support concepts to youngsters. Players must time their skating to arrive at the designated receiving zones on time for a possible pass. Here's the diagram: Controlled Skating Breakout Drill 1. 2 lines of Fs and Ds on the blue lines (out of the way) 2. D starts drill on dot 3. On the whistle, F passes to D, who pivots toward the boards, then skates behind the net to initiate a breakout 4. F control skates through each of the 4 receiving zones, presenting him or herself as a passing option in each zone (never taking eye off puck) 5. After receiving pass, F attacks 1 on…
Read More
Burkart 2 on 2 Deflection

Burkart 2 on 2 Deflection

1 on 1's, 2 on 2's, 2 on 1's, 3 on 2's, Hockey Drills, Individual Skill Drills, Passing & Timing, Shooting, Team Skill Drills
Burkart 2 on 2 Deflection My good buddy, and assistant coach, Josh Burkart showed this one to me a couple of years ago. It's a solid drill that has a pretty quick rotation, so not much standing around once your players pick up the flow of it. Here's the diagram: Burkhart 2 on 2 Deflection Drill 1. (F) passes to (D) then drives net 2. D to D pass and shot 3. (F) deflects, then stays in front 4. Other corner passes out to (D) then drives net 5. D to D pass and shot 6. Other (F) deflects 7. (F)'s swing for a breakout pass then attack 2 on 2 8. After second shot, (D)'s back up 2 on 2 Enjoy! USE THIS DRILL IN YOUR OWN PRACTICE PLAN:
Read More